Move Office 365 Mailbox to Another Account – Easiest Way
If you want to move the office 365 mailbox to another account, how could users resolve it? In this write up we will discuss how to migrate the office 365 mailbox to different users. To make it clear we will take one user query from the forum website.
I am system administrator in an organization and I have to transfer office 365 mailbox to another tenant. I am looking for an appropriate solution to fix this error. Is there any solution to office 365 transfer email to another account? Can anyone please recommend me any reliable solution to do the same? If yes then how?
Solution to Move Office365 Mailboxes to another Account
Here we will discuss the set of solutions to migrate mailboxes from one Office365 account to a different account.
Workaround 1: Start to Plan before 3 Days
Prepare Main and Aimed Account: To make changes in the processing accounts, follow below mention steps:
- Assure that a specific location tenant is for the source exchange online domain
- Add the source account to the destination O365 account. Generate a TXT record when users is done with it
- DNS record requires 72 hours to exhibit the circulation
Note: make certain that the basis and destination account mailboxes are not used by any other application.
Office 365 Cross Tenant Migration Platform Setup
- Create a list of mailboxes of all which are to be transferred
- Map the targeted and basis tenant mailboxes, if it is needed to include them.
Preparation of Office 365 Source Account
- Remove the targeted email ID of the O365 tenant wherever it is configured.
- Reset all the URLs to the start point if the account configuration is complete
- Deleted MS Lync licensing with the assist of the Lync admin portal
- Create a setting where the default email ID of the mailboxes of the targeted account has been entered. Once the procedure till now is complete, reset all the email addresses on rooms, distribution list, and resources to the first point.
Preparation of Office 365 Target Account
- If users are using AD FS then, install the target O365 account & generate new domains within it.
- Grant all the permissions and licenses needed for migration to another new account for Office 365 tenant migration
- Found the main account as a basic mailing address
- In case, the user is not using the password sync feature or AD FS then, the password of each mailbox is to be mentioned in the account domain
- Check the mail flow for testing how the account works under other environments.
Workaround 2: Change the Passwords in Batch
- Initially, launch an excel spreadsheet & create a CSV file and its name as password.csv
- Then, Now create two columns with the name upn and password in this excel file
- After that, insert all the account details in this sheet
- At the end, Run MS exchange PowerShell Windows then perform the following command to execute O365 tenant to tenant migration
Import-Csv password.csv|%{Set-MsolUserPassword –userPrincipalName $_.upn -NewPassword $_.newpassword -ForceChangePassword $false}
Workaround 3. Copy the Messages
Perform these PowerShell commands to begin coping messages from the basic domain to any specific proxy addresses present in the CSV file:
# Script: showproxies.ps1
# Copies all accounts in Office 365 that contain/don’t contain a specific
# proxyaddress to a .CSV file (addresses.csv)
#
# Change the following variable to the proxy address string you want to find:
# $proxyaddr = “onmicrosoft.com”
################################################################################
$proxyaddr = “onmicrosoft.com”
# Create an object to hold the results
$addresses = @()
# Get every mailbox in the Exchange Organisation
$Mailboxes = Get-Mailbox -ResultSize Unlimited
# Loop through the mailboxes
ForEach ($mbx in $Mailboxes) {
# Loop through every address assigned to the mailbox
Foreach ($address in $mbx.EmailAddresses) {
# If it contains XXX, Record it
if ($address.ToString().ToLower().contains(“onmicrosoft.com”)) {
# This is an email address. Add it to the list
$obj = “” | Select-Object Alias,EmailAddress
$obj.Alias = $mbx.Alias
$obj.EmailAddress = $address.ToString() #.SubString(10)
$addresses += $obj
}
}
}
# Export the final object to a csv in the working directory
$addresses | Export-Csv addresses.csv -NoTypeInformation
# Open the csv with the default handler
Invoke-Item addresses.csv
##### END OF SHOWPROXIES.PS1
Step 4: For Office 365 Tenant, Generate a Room Mailbox
Follow these commands to execute Office 365 cross tenant migration:
Script: create-rooms.ps1
# Description:*** RUN THIS SCRIPT FROM A WINDOWS POWERSHELL SESSION ***
#This script creates Room mailboxes in Office 365.
# Syntax:Create-Rooms.ps1 -inputfile “file name.csv”
#
# Dependencies: Input file should contain 3 columns: RoomName, RoomSMTPAddress, RoomCapacity
#
################################################################################
param( $inputFile )
Function Usage
{
$strScriptFileName = ($MyInvocation.ScriptName).substring(($MyInvocation.ScriptName).lastindexofany(“\”) + 1).ToString()
@”
NAME:
$strScriptFileName
EXAMPLE:
C:\PS> .\$strScriptFileName -inputfile `”file name.csv`”
“@
}
If (-not $inputFile) {Usage;Exit}
#Get MSO creds and initialize session
If ($cred -eq $NULL) {$Global:cred = Get-Credential}
#
If ($ExchRemoteCmdlets.AccessMode -ne “ReadWrite”)
{
Write-Host
type-Host Connecting to Office 365…
Write-Host
$NewSession = New-PSSession -ConfigurationName Microsoft.Exchange -ConnectionUri https://ps.outlook.com/powershell -Credential $cred -Authentication Basic -AllowRedirection
$Global:ExchRemoteCmdlets = Import-PSSession $NewSession
}
#Import the CSV file
$csv = Import-CSV $inputfile
#Create Rooms contained in the CSV file
$csv | foreach-object{
New-mailbox -Name $_.RoomName -room -primarysmtpaddress $_.RoomSMTPAddress -resourcecapacity $_.RoomCapacity
}
END OF CREATE-ROOMS.PS1
Step 5: Delete the Secondary Addresses from O365 Mailboxes
Run these commands:
#Script: remove-proxy.ps1
#Description:*** RUN THIS SCRIPT FROM A WINDOWS POWERSHELL SESSION ***
#This script will remove a secondary email address from many users
#
# Syntax:remove-proxy.ps1 -inputfile “filename.csv”
#
# Dependencies:Input file should contain 2 columns: Username, Emailsuffix
# Example: Username=tim, Emailsuffix=fabrikam.com
#Script will remove the address tim@fabrikam.com from the mailbox for Tim.
#NOTE: Address must be secondary; it will not remove primary email address.
#
################################################################################
param( $inputFile )
Function Usage
{
$strScriptFileName = ($MyInvocation.ScriptName).substring(($MyInvocation.ScriptName).lastindexofany
(“\”) + 1).ToString()
@”
NAME:
$strScriptFileName
EXAMPLE:
C:\PS> .\$strScriptFileName -inputfile `”file name.csv`”
“@
}
If (-not $inputFile) {Usage;Exit}
#Get MSO creds and initialize session
If ($cred -eq $NULL) {$Global:cred = Get-Credential}
#
If ($ExchRemoteCmdlets.AccessMode -ne “ReadWrite”)
{
type-Host
type-Host Connecting to Office 365…
Write-Host
$NewSession = New-PSSession -ConfigurationName Microsoft.Exchange -ConnectionUri
https://ps.outlook.com/powershell -Credential $cred -Authentication Basic -AllowRedirection
$Global:ExchRemoteCmdlets = Import-PSSession $NewSession
}
#Import the CSV file and change primary smtp address
$csv = Import-CSV $inputfile
$csv | foreach-object{
# Set variable for email address to remove
$removeaddr = $_.username + “@” + $_.emailsuffix
Write-Host (“Processing User: ” + $_.UserName +” – Removing ” + $removeaddr)
Set-Mailbox $_.Username -EmailAddresses @{Remove=$removeaddr}
}
##### END OF REMOVE-PROXY.PS1
How to Migrate Office 365 Mailbox to another User Account – With Simpler Way
Office 365 to Office 365 Migrate software is one of the best trusted and ultimate solutions for multiple kinds of data move operations. In addition, we can say IT experts are also using this automated tool to perform this technical operation without any issue.
This utility is capable enough to migrate contacts, emails, documents, and calendars from one O365 account to another instantly. This software provides a user mapping option to generate the mapping between source Office 365 tenant & destination Office 365 tenant.
Moreover, it provides a free trial version to its users. The trial edition can transfer two users’ accounts completely without any price. In this way, users can also self-verify the working and high performance of this application.
Working Steps to Transfer Office 365 Mailbox to another User Account
- Firstly, Download and install the tool then select Office 365 as source & destination
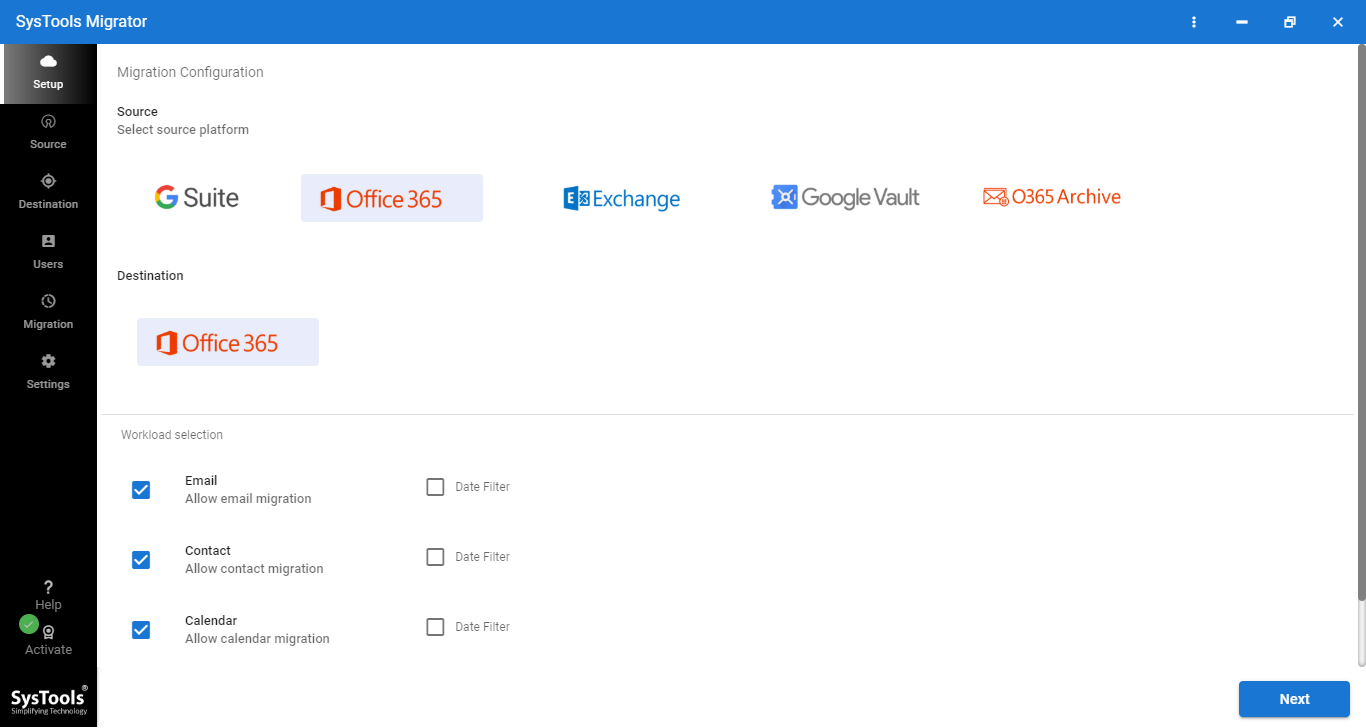
- Then, Select items email, document, contact, and calendar from workload selection
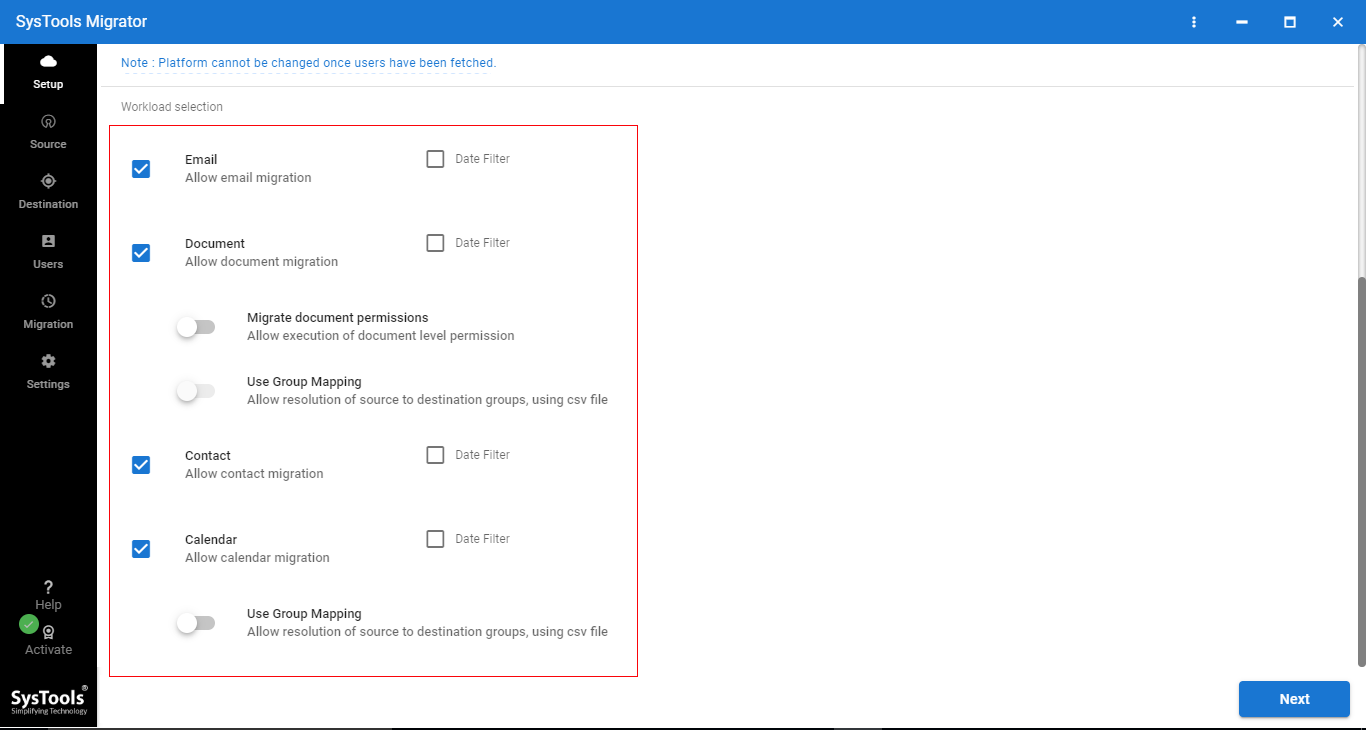
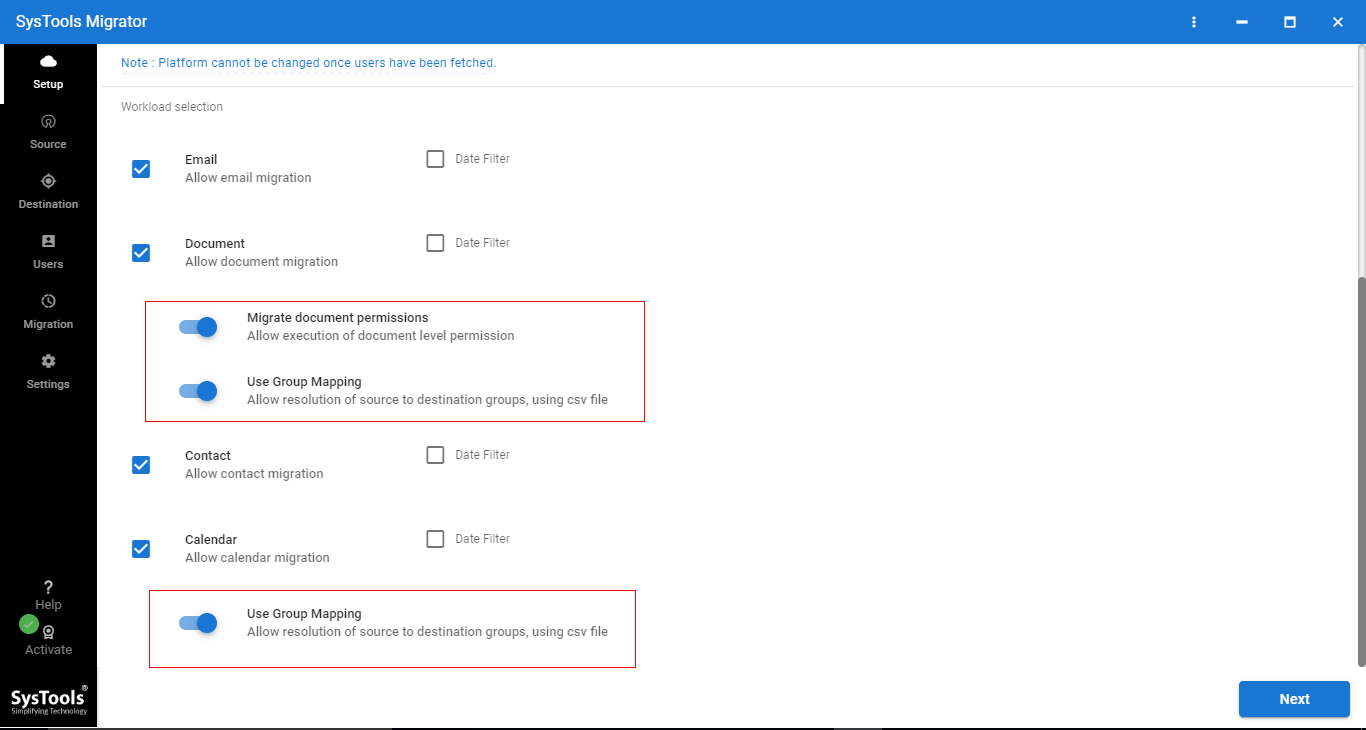
- Now, the tool will provide a date filter, migrate documents permissions, use group mapping options. Users can use these options from the same screen. After that, hit on next.
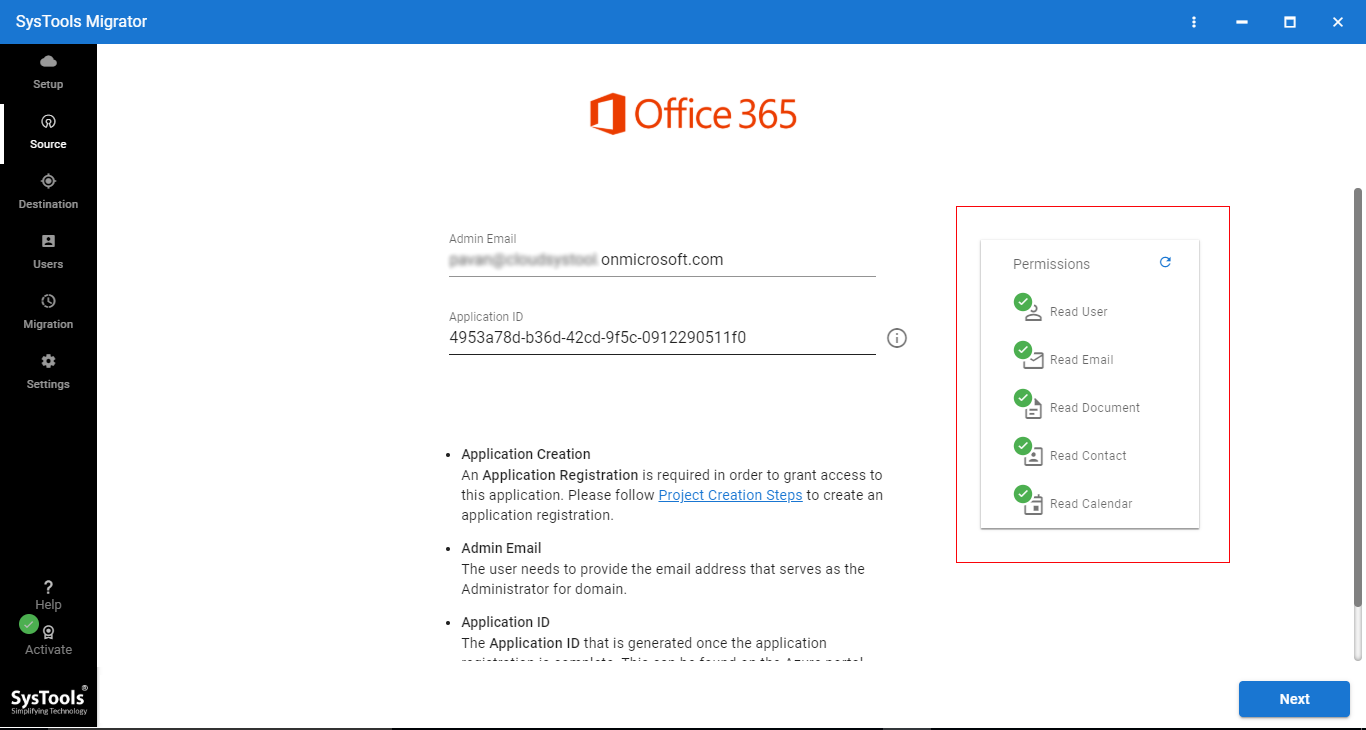
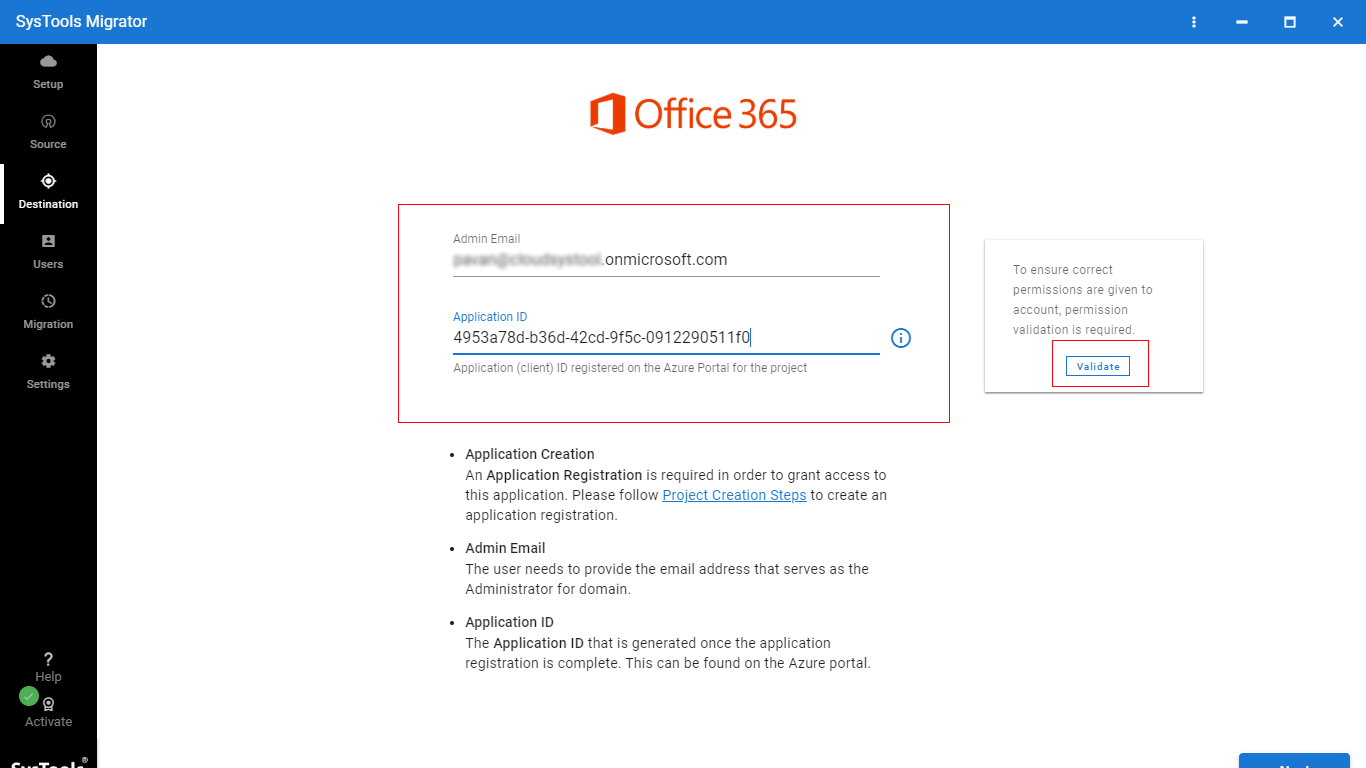
- After that, enter the O365 source admin ID & application ID, after that, hit on the validate button to validate
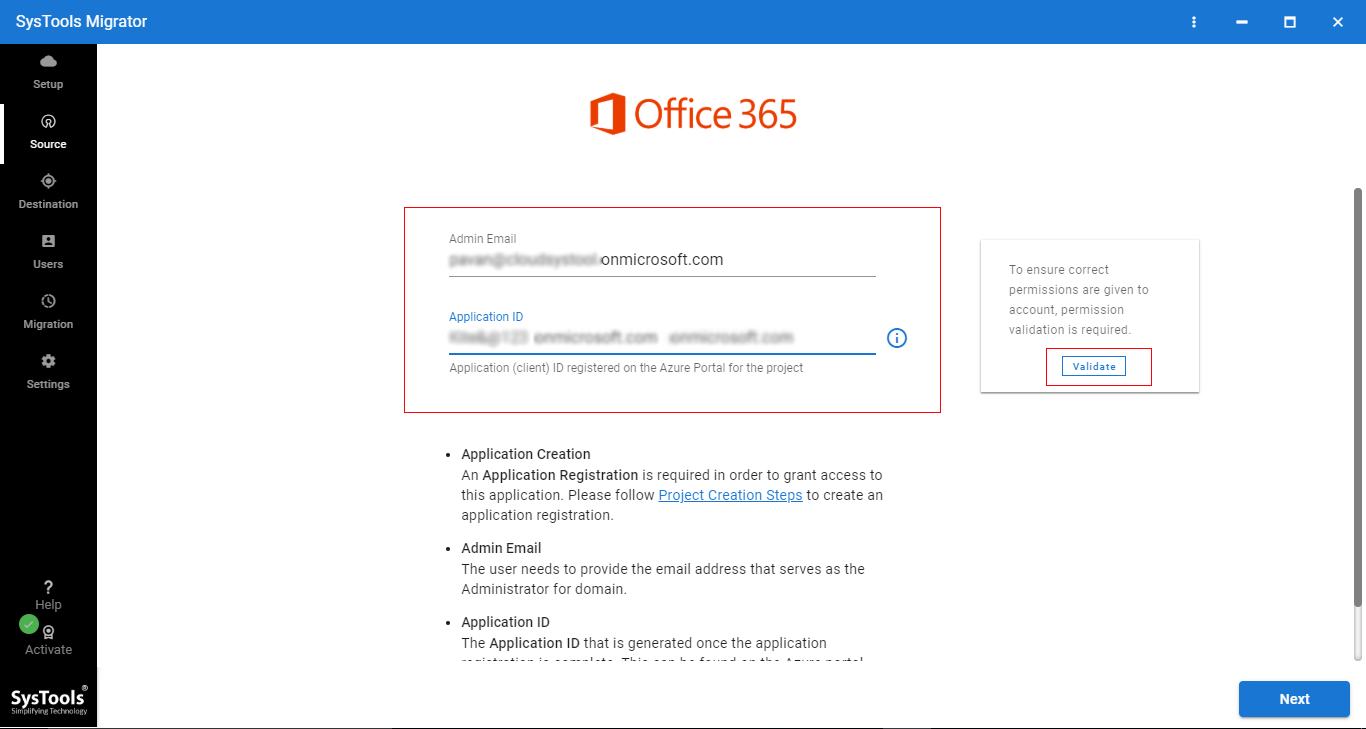
- Then, validating permissions by tool, hit on next button
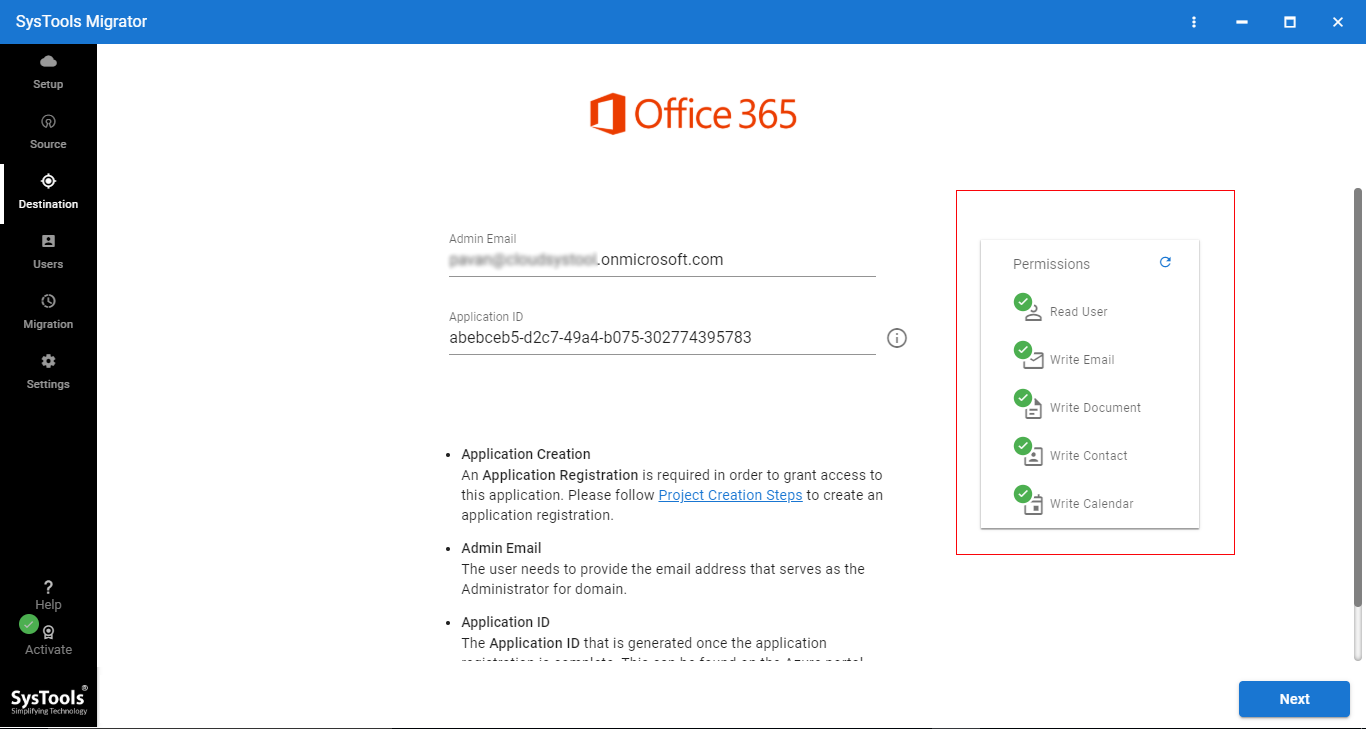
- Now, enter Office365 destination admin ID & application ID then hit on the validate button
- Once permissions are validated hit on the next button
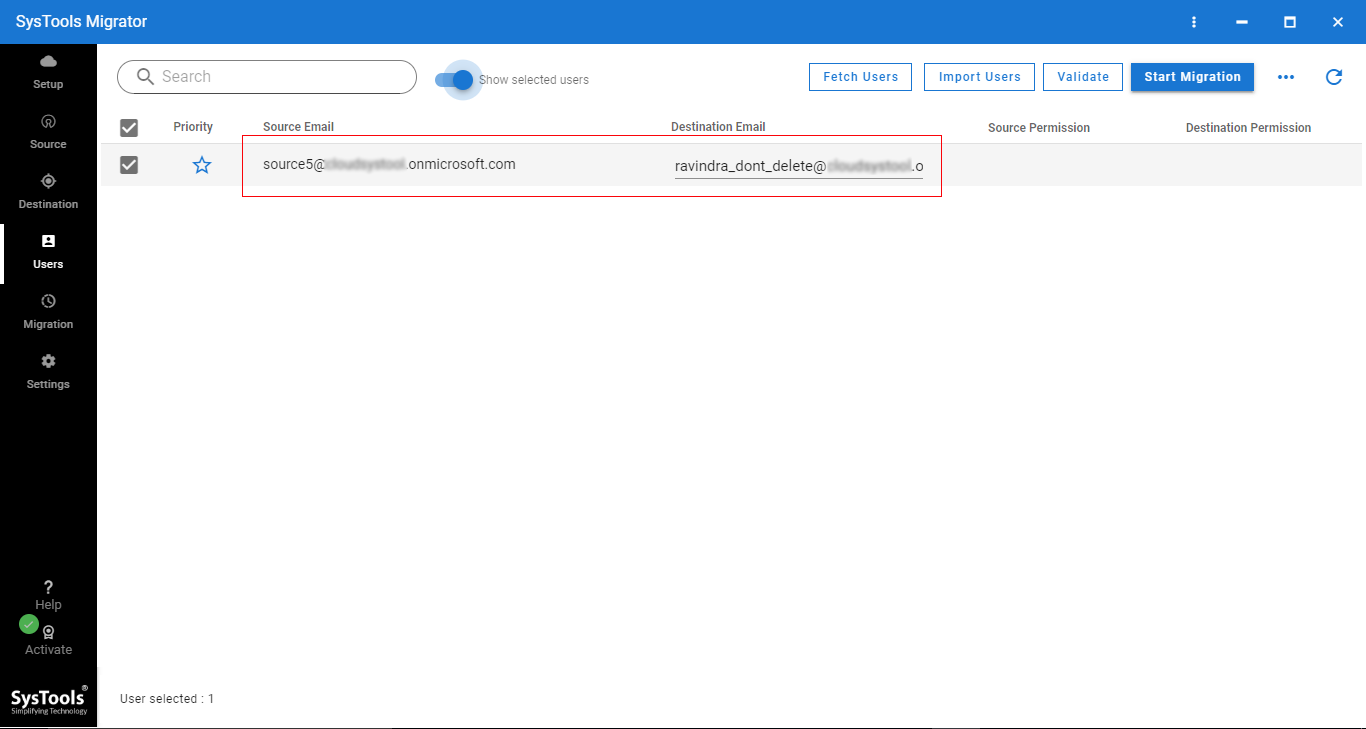
- Now, we have to generate a mapping between source and destination Office 365 users. To do this tool offers three options fetch users, import users, and download template. Choose an option for user mapping
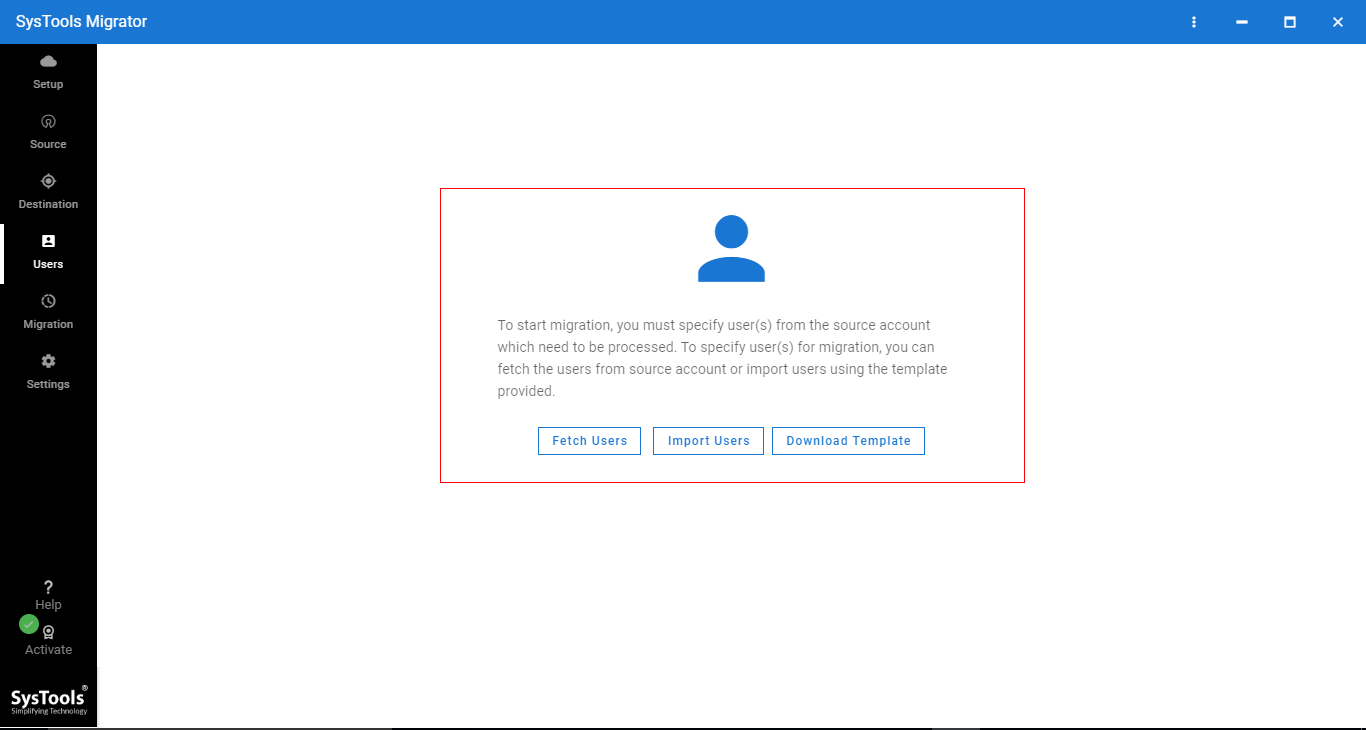
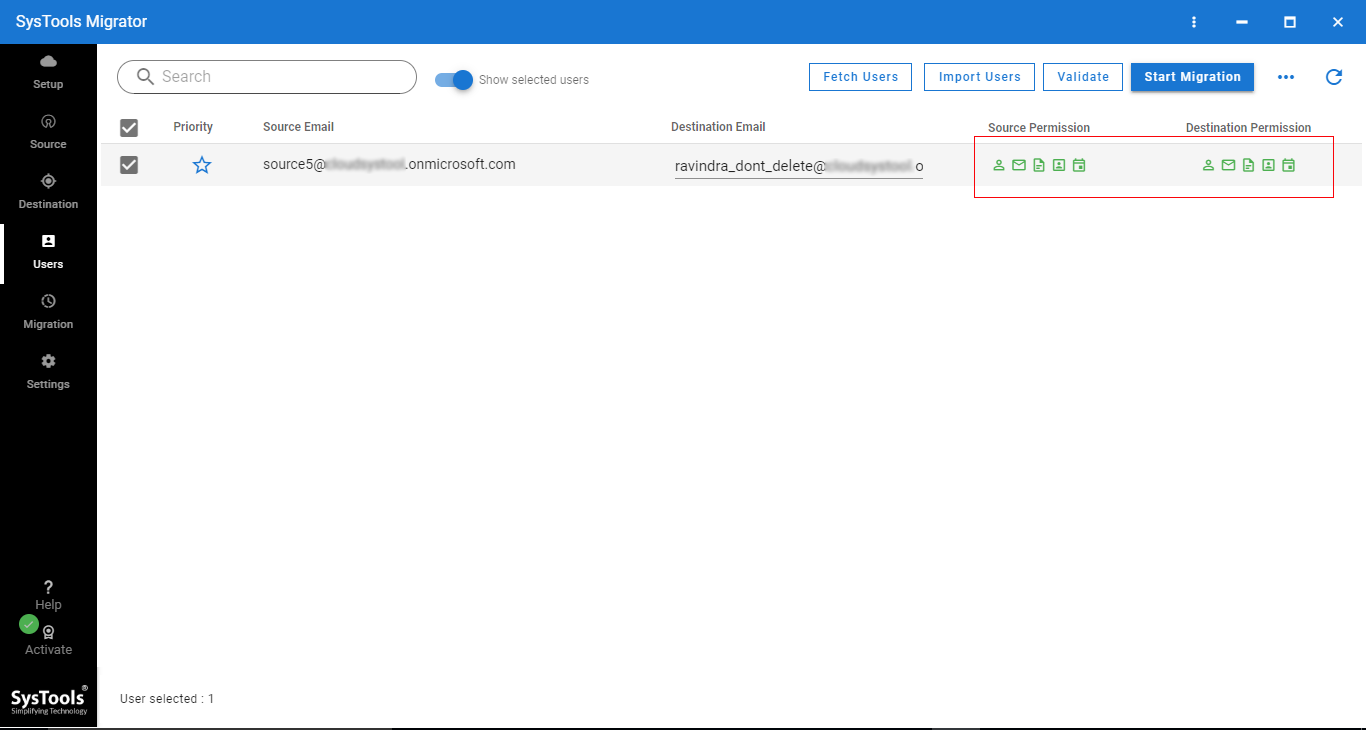
- Mapping is successfully generated between users. Hit on the Validate button to validate permissions.
- Finally, Once permissions are validated hit on the Start Migration button to transfer Office 365 mailboxes to another.
Summing up
It is asked by several Office 365 users to move Office 365 mailbox to another. This write-up serves the best possible way to execute how to transfer mailboxes from one account to another.